A half-baked set of patches for OpenBSD on the Pinebook Pro
This is a follow-up article to my earlier tutorial on installing OpenBSD on the Pinebook Pro. As you might recall, there were quite a few CAVEATs regarding things that (still) do not work, as compared to a better supported hardware platform (or for that matter, Linux on the Pinebook Pro).
Well, after having spent some spare bits of my time looking at the most vexing issues, and having emerged from Mickensian depths of despair, I have some rough results. OpenBSD boots up on my Pinebook Pro with a working console, and is able to power off the hardware on shutdown. A warm reboot works without a corrupted and frozen display. Last but not least: the changes make it possible to perform an OpenBSD installation on the “real” console, without touching a serial terminal!
However, a word of warning is in order. This is not for the faint of heart. Some of my patches are clearly tactical/speculative, and are provided for your entertainment only. (Yes, you are allowed to laugh at my dilettante approach. But feel free, in fact I challenge you, to improve upon it and share your results with me!)
For reasons above, I am going to provide much less hand-holding than in my previous article. You are expected to know your way around building an OpenBSD kernel from source based on authoritative guidance such as faq5 and release(8). To be abundantly clear: none of this article is authoritative in any way. I am not an OpenBSD developer and do not speak for the OpenBSD project. Do not merge the below changes on a device that means anything to you apart from being a research vehicle (disposable test toy). You accept full responsibility for everything you do with your laptop.
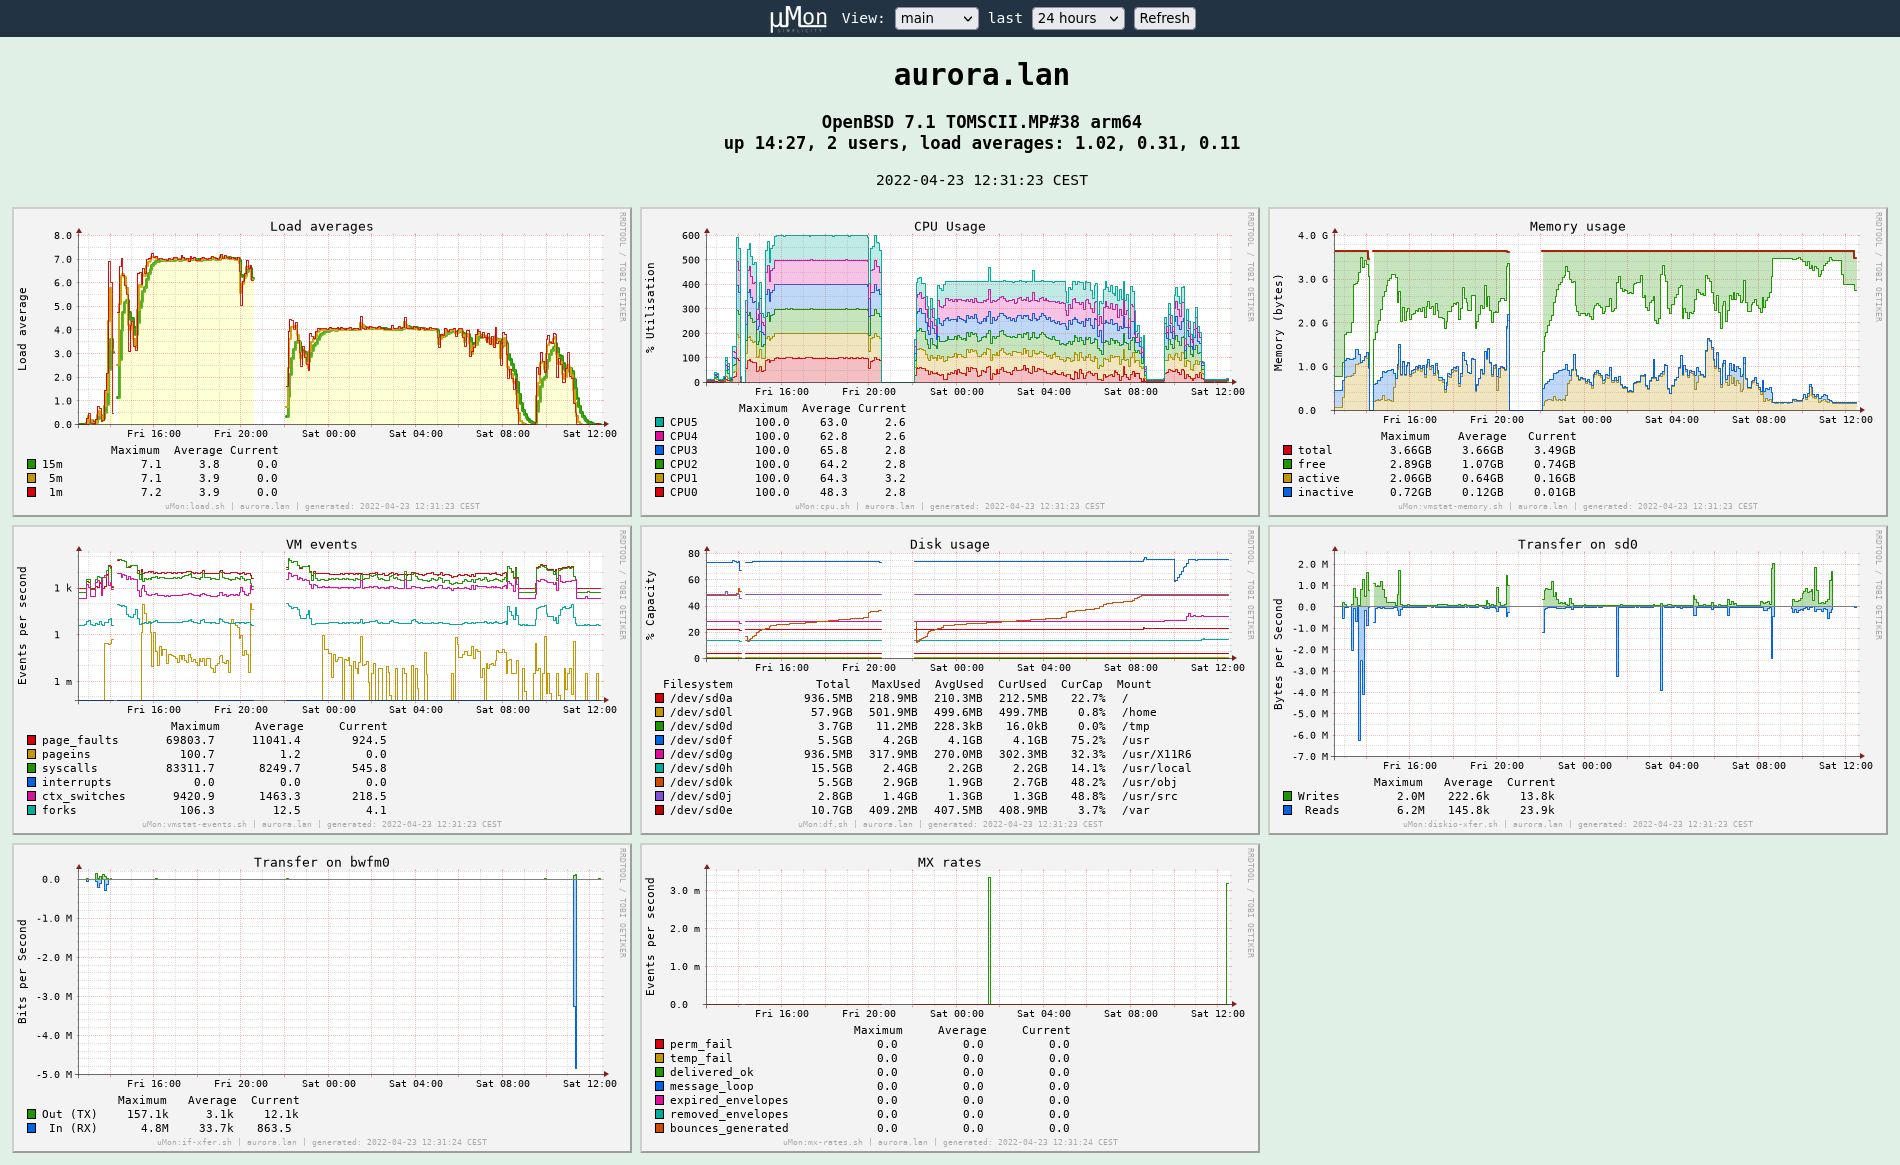
Hint: compiling OpenBSD on the Pinebook Pro takes many hours (see an
upgrade run captured by my monitoring
setup). Compiling the kernel
takes around 15 minutes with -j 4; userland builds in about ten and
a half hours; Xenocara in one hour and a half (also with -j 4). Plan
accordingly. May this article help you continue where I left off —
and please publish your results for the benefit of all!
TL;DR
Below I present you with a bumpy journey, but considerably cut down on dead ends and research that led to nowhere. I try to present you only with the relevant and interesting bits. I still understand if you are not into wading through it. So here are the links to all the patches offered in this article.
- 01-efi-detect-framebuffer
- 02-fix-simplefb-color-layout
- 03-fix-rkclock-induced-breakup
- 04-remove-anxdp-bringup
- 05-fix-rkpmic-powerdown
- 06-u-boot-display-reset-hack
Note: I added a txt extension to all patches so you can click and
look at them directly in the browser. They have some remarks at the
top, but please do read the below article for the full context around
them.
The console
Initially, I had no plans to do any of this. But shortly after my previous article started making the rounds on the usual websites, I was contacted by Tomasz Bielecki, who told me about his earlier (partially successful) attempts to fix some of the issues I mentioned. He was kind enough to give me his patches and even allowed me to publish them. I was greatly inspired by his work, and thought it should be made available to interested people. It also inspired me to poke around in the OpenBSD kernel myself, which in turn sent me on a trip down memory lane compiling the whole operating system, including the kernel, from its sources. (I used to do that 20 years ago with Linux. It was fun for a while…)
Enabling the console
The aim of the first patch Tomasz shared with me was to enable the
console. This patch concerns the OpenBSD bootloader. This is started
by U-Boot, but it is not the OpenBSD kernel yet, it is a separate
program loading the kernel. It is the component that prints boot> at
the beginning (allowing you to intervene and interact, to a limited
degree), but also serves as a bridge between low-level hardware
drivers part of the bootloader (U-Boot) and the OpenBSD kernel itself,
its successor in gaining control of the machine.
So, there is a certain set of low-level machine capabilities provided by U-Boot that is exposed via the UEFI interface (not entirely unlike the legacy BIOS on PC architectures).
Digression: this whole topic gets pretty deep right off the bat, and there is not a good way to go around it. Documentation that is accessible to mere mortals is hard to come by. I am not in a position to educate anyone, as I am very far from being an expert. I spent some time diving into UEFI specs, devicetree specs, ARM trusted firmware, and of course U-Boot. It’s a big entangled mess with several loosely coupled, interrelated systems, standards and parties all involved in bootstrapping multicore arm64 computers. Complicated would be a slight understatement.
Anyway, it turns out that there is already a framebuffer device (conforming to the simple-framebuffer interface) in the device tree initialized by U-Boot, available for subsequent programs to use. And the patch 01-efi-detect-framebuffer from Tomasz enables OpenBSD’s arm64 bootloader to recognize and pass this framebuffer on to the OpenBSD kernel so that it, too, is able to use it.
If you already have an up-to-date compiled source tree of OpenBSD on
the PBP, you can recompile and install just the bootloader that the
patched efiboot.c is part of. This is how I did it:
# cd /usr/src/sys/arch/arm64/stand/efiboot
# make
# mount /dev/sd0i /mnt
# cp obj/BOOTAA64.EFI /mnt/efi/boot/bootaa64.efi
You also need to set it up so the framebuffer will be chosen as the console:
# echo "set tty fb0" > /etc/boot.conf
With that in place, a reboot is in order.
Fixing the color layout
Now, instead of the screen going blank the very moment the OpenBSD kernel starts to run, this is what we get:

Framebuffer redness (click to enlarge)
The above picture is a still frame of a video I made with my phone. As
you can see, it was not even close to my first try (kernel
TOMSCII.MP has been recompiled 33 times so far, which should tell
you something about how dark those Mickensian depths really are). But
at long last, we have a breakthrough! What is immediately apparent
though is that the background color is wrong: it is red; clearly, it
should be blue. How can that be?
Well, the color components in the framebuffer cells are in reverse, BGR versus RGB, which makes blue look red. Fixing this is easy enough, if you spend the time to find where to look. Patch 02-fix-simplefb-color-layout is an easy win! After recompiling the kernel with it, you can reboot and enjoy the boot console with colors as they were meant to be.
Fixing the console image breakup
Well, you can sit back and rejoice for about 3 seconds, before something happens and the image gets corrupted as if having lost horizontal sync. It gets broken up, somewhat like if a strong fan was blowing it out from the left. The upper left corner is fastened in place, but the lower we go, the larger the blow towards the right. The whole screen image flickers at random. The console seemingly keeps updating but is completely illegible.
After carefully observing this for a couple times, I have again started to record the console with my phone and played back the videos frame-by-frame, to see where the blowup starts. I found that it starts right after these lines:
rkclock0 at mainbus0
rkclock1 at mainbus0
So it is some kind of hardware clock or PLL setting that results in
the breakup. That seems very reasonable, but how to narrow it down?
Well, I started putting in printf() statements in
sys/dev/fdt/rkclock.c (the source code of the rkclock driver), so
as to trace the execution and narrow down the exact code path that is
the root cause of the image blowup. After some trial and error, I
captured this frame:
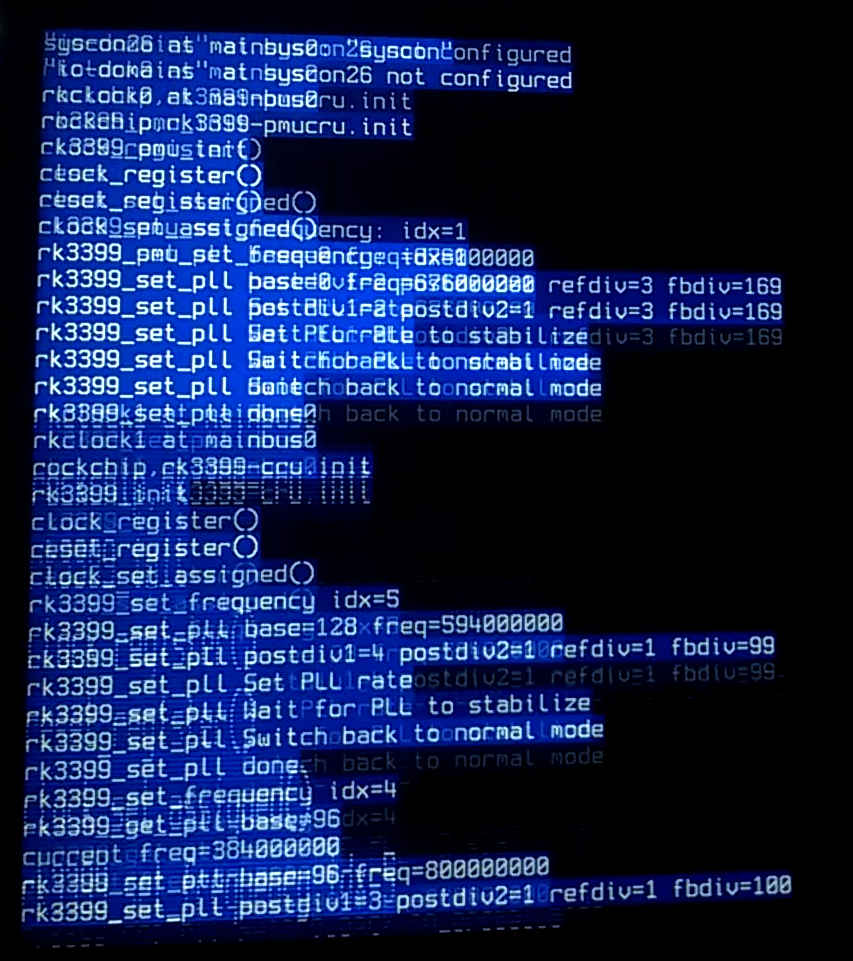
The critical moment (click to enlarge)
The exact moment of the video signal breaking up. Below is the output
up to this point (these are the results of my debug statements, so you
won’t see them, but they should help you understand the code flow in
rkclock.c, should you want to do that):
rkclock0 at mainbus0
rockchip,rk3399-pmucru.init
rk3399_pmu_init
clock_register()
reset_register()
clock_set_assigned()
rk3399_pmu_set_frequency: idx=1
rk3399_set_pll base=0 freq=676000000
rk3399_set_pll postdiv1=2 postdiv2=1 refdiv=3 fbdiv=169
rk3399_set_pll Set PLL rate
rk3399_set_pll Wait for PLL to stabilize
rk3399_set_pll Switch back to normal mode
rk3399_set_pll done
rkclock1 at mainbus0
rockchip,rk3399-cru.init
rk3399_init
clock_register()
reset_register()
clock_set_assigned()
rk3399_set_frequency idx=5
rk3399_set_pll base=128 freq=594000000
rk3399_set_pll postdiv1=4 postdiv2=1 refdiv=1 fbdiv=99
rk3399_set_pll Set PLL rate
rk3399_set_pll Wait for PLL to stabilize
rk3399_set_pll Switch back to normal mode
rk3399_set_pll done
rk3399_set_frequency idx=4
rk3399_get_pll base=96
current freq=384000000
rk3399_set_pll base=96 freq=800000000
rk3399_set_pll postdiv1=3 postdiv2=1 refdiv=1 fbdiv=100
<<display breaks>>
It is thus clearly established that the culprit lies in the setting of
RK3399_PLL_CPLL (which corresponds to idx=4) in
rk3399_set_frequency(). Since I added a call to rk3399_get_pll()
beforehand, I know that the original frequency was 384 MHz at that
point. The new setting was going to be 800 MHz. However, as soon as
the divisors for that value hit the registers of the clock device, the
display image gets blown away.
My next patch, 03-fix-rkclock-induced-breakup does nothing but makes
rkclock skip the above PLL frequency setting. As a result, the
console stays clean during boot, the flicker no longer happens! Even
better, subsequent operations do not seem to be affected by the lack
of this PLL setting.
Please note: This is most likely not an acceptable solution. There must be a better way to fix this, but that would require some real understanding (that I do not have) of what is wrong with this setting. That said, I have been running my PBP with this patch for a couple weeks now and have not experienced any change in how the system behaves. YMMV.
Fixing the blackness
Now, after boot-up, the console looks healthy for a good while. But alas, there is more trouble coming. At some later point, the screen goes black. It stays dark until it finally comes back on, several seconds later, with this line of output at the top of the screen:
rkdrm0: 1920x1080, 32bpp
That is when the DRM driver takes over driving the video output. I suspect that a whole new video pipeline gets initialized at this point, flushing away any imperfect prior settings. What we want to fix is the blackout that ends here.
Again, observing the boot process a couple of times, filming and watching it frame-by-frame, I established that the screen goes blank just before the following output would have been printed:
rkanxdp0 at mainbus0: eDP TX
WARNING !aux->drm_dev failed at /usr/src/sys/dev/pci/drm/drm_dp_helper.c:1808
At first, I was pretty certain that the blackout is directly related to this warning, and spent some time digging around in the source pointed out. But after having built some mental state of how that code works, I convinced myself that the warning is legitimately issued in certain cases.
So again, I started putting in printouts to narrow down the code path
leading to the moment where the screen gets black. This led me down
to the execution of anxdp_bringup() in sys/dev/ic/anxdp.c. That
function is one big ball of setting hardware register values, and I
have no real understanding of what it all does. You need all sorts of
hardware specs to chart a map to this territory, and I did not want to
go that deep.
I tried a couple approaches at this point. After disabling the
rkanxdp module (hardcoding rkanxdp_match() to always return 0),
the console looks fine throughout the whole boot process, but
eventually we get stuck on this message, repeated periodically:
init: can't open /dev/console: Device not configured
That is a pretty clear message: the kernel itself has all but
completed booting, but the init process refuses to start due to the
lack of a properly initialized console device.
Another idea I had is to mix up the order of initializing kernel
modules, so rkanxdp would come later, in the hope that things would
get better sorted out on the hardware level by then. I did this by
introducing a static counter in rkanxdp_match(), incremented on each
call, and shortcutting the result of that call (returning zero) below
a threshold. But it seems that this does not work either. After the
module passes up its first opportunity to latch on to the device, it
never gets called again with that same device, so we get stuck all the
same (with the above init error). I am not surprised, that was a
half-assed idea anyway.
So what if we simply skip calling anxdp_bringup()? I removed the
call to this function (within anxdp_attach()). Amazingly, after
building a new kernel with the patch 04-remove-anxdp-bringup and
booting it, the blackness is gone. OpenBSD boots all the way from
entering the kernel to starting Xenocara, and the console output
remains correct throughout. We do not get stuck anywhere.
What’s more, after having reached Xenocara, we can now switch to the console by pressing Control-Alt-F1. I mean, look, now there is a console there! We can log in! And if we plug in a new piece of hardware, such as a USB stick, we see dmesg with blue background instantly appear. In short, it all seems to work!
Again, as with the previous patch, this is almost certainly not something that could be accepted into the official OpenBSD source tree. Some kind person with much deeper knowledge of what is going on (both regarding OpenBSD kernel internals as well as innards of the RK3399 SoC) would be needed to come up with an acceptable fix. I regret to say that I am not that person; I’m just poking around in the dark.
Installing via the “real” console
Thinking about it, the above bootloader and kernel improvements should
also enable us to install OpenBSD on the Pinebook Pro with no need for
a serial terminal at all. To verify this theory, I went through the
steps of building an OpenBSD base system release, the end result of
which (among many other archives and binaries) is the bsd.rd ramdisk
kernel that runs the installer.
I followed the steps laid out under section 4. Make and validate the base system release as described in release(8).
The only step worth documenting here is the creation of the temporary
filesystem (mounted with noperm) required to contain the destination
area where the release is assembled. First I created the mount point
/var/dest and set up its ownership and permissions as required. Then
I added this entry to /etc/fstab:
swap /var/dest mfs rw,noperm,-s=1024m 0 0
Finally, I mounted the filesystem via mount /var/dest. This gave me
a newly created, empty memory-backed filesystem with a capacity of 1
GB. I created /var/release as the release output directory, and set
it up the same way, only without mounting a special filesystem on it.
Having built the base system release, I copied the newly generated
/var/release/bsd.rd to /bsd.new.rd and rebooted, directing the
OpenBSD bootloader at this ramdisk kernel:
boot> boot /bsd.new.rd
It might seem obvious, but perhaps worth pointing out: if this was coming from an official release, there would be no need to interact with the bootloader. The ramdisk kernel would be booted automatically. Hence, the fact that I had to enter the above via the serial terminal is not significant.
It was immediately apparent that the framebuffer works as it should.
Having reached the installer’s greeting banner, I pressed i on the
Pinebook Pro keyboard… and an i appeared on the screen! I carried
on through a couple more prompts to verify that the console works as
it should, but eventually interrupted the process, as I had no plans
to disrupt my existing installation.
But I made a picture! Below I present you with what I reckon is a rare sight of a Pinebook Pro laptop running an OpenBSD installer that does not rely on a serial terminal connection:
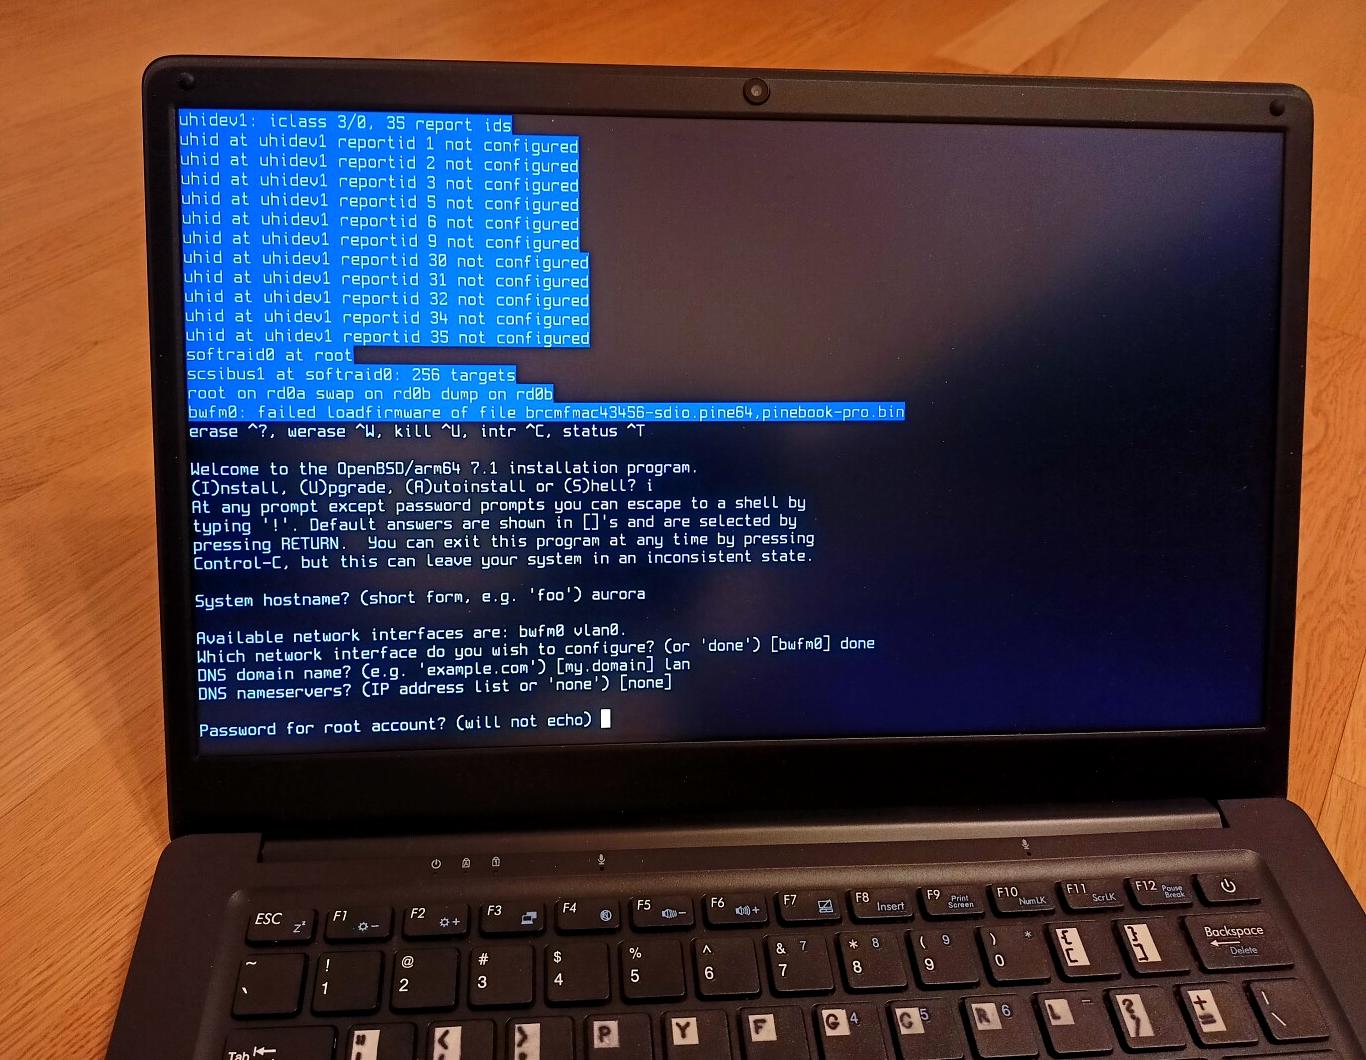
Real console OpenBSD installer on the Pinebook Pro (click to enlarge)
For the record, 780 MB of the memory filesystem’s capacity was
eventually used. N.B.: do not forget to remove the entry from
/etc/fstab, or the filesystem will get created on each boot!
Can we use the keyboard during early boot?
The above results prove that a much less clumsy, much more accessible and mainstream method of installing OpenBSD than previously presented is within practical reach. I hope the necessary changes will be upstreamed or adapted (as appropriate) reasonably soon.
Unfortunately, we still cannot have “usable” full disk encryption, due to the fact that the keyboard does not yet work during the early boot phase. If we have to interact with U-Boot or the OpenBSD bootloader, we must have a serial terminal set up and connected. Can we fix this?
Having learned a bit about U-Boot, I started poking it to learn more about its console setup.
=> coninfo
List of available devices:
serial@ff1a0000 00000007 IO
serial   00000003 IO stdin
nulldev  00000003 IO
vidconsole 00000002 .O stdout stderr
As expected, it tells me that stdin is attached to serial, with
the output going to vidconsole. Given that the Pinebook Pro keyboard
is internally connected via USB, my next thought was to enable the USB
stack:
=> usb start
This yielded a bunch of messages as U-Boot went on its way to probe
the hardware and the devices it found on the USB bus. This took a few
moments, and the USB keyboard was detected! I pressed a key on the
laptop, and… it appeared on the screen! To confirm, I ran coninfo
again:
=> coninfo
List of available devices:
serial@ff1a0000 00000007 IO
serial   00000003 IO
nulldev  00000003 IO
vidconsole 00000002 .O stdout stderr
usbkbd   00000001 I. stdin
So not only did U-Boot detect the USB keyboard, it was smart enough to
migrate stdin to the usbkbd device! Input is still being accepted
from the serial line, just as output is echoed there as well as the
video screen. Awesome!
Excited about the result, I typed boot to nudge U-Boot towards
booting OpenBSD. Then, the screen went black… and stayed black.
Uh oh.
Let’s try again… I did usb start again, confirmed that the laptop
keyboard works with U-Boot, and then typed usb stop. I got a
response stopping USB.. and then… nothing. The thing was frozen.
So at least it was not OpenBSD at fault; I guess U-Boot never managed
to launch the OpenBSD bootloader. Even if it did, I highly doubt that
efiboot has USB support, so this may well be a dead end. Or maybe
U-Boot would be able to set up the console input in a way that
efiboot does not have to care? I don’t know for sure, but I gave up
at this point.
If you know how to make this work, please do let me know.
Poweroff
Another annoying issue is having to press and hold the power button for several seconds to power off the Pinebook Pro. Apparently, the power management circuit (RK808 in the PBP) is not properly interfaced with.
It turns out that the issue lies in the ARM Trusted Firmware (ATF) layer, which is supposed to provide platform-specific support for this (so the operating system does not have to). I know this because there is a patch to fix said issue. Unfortunately, the patch has been abandoned due to some entirely banal issues (the maintainers made some nitpicky comments which the author did not address, so the patch fell on the floor). Sigh.
Again, enter Tomasz Bielecki who sent me his clever patch that fixes
the issue in the OpenBSD kernel’s rkpmic driver (that controls the
RK808). You know the drill: apply 05-fix-rkpmic-powerdown to your
kernel source tree, recompile, install and after the next reboot, test
it with a shutdown -h -p now.
Given that ATF builds on OpenBSD (see the port
sysutils/arm-trusted-firmware), it should be straightforward to
apply the abandoned patch to that port and build ATF on the PBP. This
would in turn require rebuilding and reinstalling U-Boot, as ATF is a
dependency of that. I am leaving this as an exercise for later, given
that the rkpmic patch works perfectly well.
Warm reboot
Okay, so OpenBSD starts up pretty cleanly on my Pinebook Pro, I have a system console (fully operational post-boot), and I can order the thing to power itself off. However, there is an issue with warm reboots: the display will get locked up in some corrupted state, showing vertical lines over a grey background (at least that is what my PBP looks like; yours might look different). This might be bearable if it went away at a later phase during the subsequent boot process, but alas, it does not. So you are stuck with an unusable laptop (or, let’s not make value judgments here, at least a laptop without a working graphical display).
The good news is that there is a patch against U-Boot which fixes this. To make use of it, you will need to build U-Boot from ports with this patch added, and overwrite your existing bootloader with it.
You are assumed to have setup OpenBSD’s ports according to the friendly guide and to be familiar with the ports(7) manpage as well. What follows below are my own, entirely non-authoritative, instructions.
Before attempting to build the sysutils/u-boot port, you better
pkg_add all its dependencies. Otherwise, these dependencies will
also be built from their respective ports, and given their complexity
times the Pinebook Pro’s modest compute power, that would take
approximately forever.
# pkg_add aarch64-none-elf-gcc-linaro \
          arm-none-eabi-gcc-linaro \
          arm-trusted-firmware \
          bison dtc swig \
          py3-elftools
Now, since you read ports(7), you
know about FLAVOR, and having looked into the port Makefile, you
noticed that aarch64 is the only one you actually need. That is
great, but there is one more change worth making. Remove all BOARDS
(right below the line that reads .if "${FLAVOR}" == "aarch64"). The
only required value (in case you were wondering) is
pinebook-pro-rk3399, so delete everything else (including the
SUNXI64 ones). This will spare you tons of time that you would have
spent building U-Boot for devices you do not have. (In case you are
really curious, building all the boards for just aarch64 took me
four hours. Building only the PBP target, on the other hand, took less
than nine minutes.)
Before you kick off the port build, save the patch
06-u-boot-display-reset-hack under patches/ renamed as e.g.
patch-display-reset-hack (the name must start with patch- for it
to be picked up).
Then, do the build (assuming you are in /usr/ports/sysutils/u-boot):
# env FLAVOR="aarch64" make
After that is complete, you need to write the bootloader binaries to your eMMC principally the same way as you did when you installed OpenBSD. As ever, please check and adapt your paths (this assumes your ports setup matches mine exactly, which might or might not be the case):
# cd /usr/obj/ports/u-boot-aarch64-2021.10-aarch64/u-boot-2021.10/build
# dd if=pinebook-pro-rk3399/idbloader.img of=/dev/sd0c seek=64
# dd if=pinebook-pro-rk3399/u-boot.itb of=/dev/sd0c seek=16384
After a reboot, you should see all U-Boot banners embellished with today’s date, confirming that you are running the freshly compiled version of U-Boot. And on a subsequent warm reboot, the screen will go black before showing the U-Boot screen you know and love, but only managed to see on cold boots up to now.
Unfortunately, this patch is a blatant hack, and such hacks are (quite understandably) not welcome into OpenBSD.
Conclusion
This concludes today’s treatise on fixing (or at least working around)
some issues with OpenBSD on the Pinebook Pro. Unfortunately, quite a
few of the patches presented here are not really suitable for
upstreaming, so they are not the real deal for users less than willing
or able to spend time tinkering with their device. Some expert
attention would be needed to arrive at agreeable solutions that are
properly baked into upstream, once and for all. There are also plenty
of issues left to tackle: bwfm habitually freezing during boot, plus
the total lack of suspend/resume support come to mind as the most
impactful ones.
That said, I am hoping that this article will help others continue from where I am now leaving this, and contribute to a well working FREE operating system on the hackable, open source hardware of the Pinebook Pro. Given the nature of these things, we cannot expect any commercial entity to pour resources into hammering out all the issues, so it is on all of us to do what we can.
If you’ve read this far, you have my respect (and thanks for your attention). Please remember: if you manage to advance the state of the art, I would love to hear from you!