|
TAP-plugins Tom's Audio Processing plugins for audio engineering on the Linux platform |
|
If the program is correctly installed on
your system, all you have to do is type
reverbed. However, there are a few command-line
parameters that are worth mentioning:
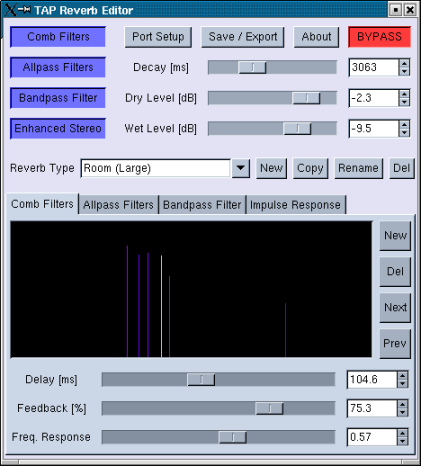
The main window (as shown above) lets you do most of the work. It consists of three areas: the top part provides controls for adjusting global parameters of the reverberation unit, as well as three buttons to launch additional windows (Port Setup, Save / Export, About). The middle part (with the combo box and the New, Copy, Rename, Del buttons) lets you manage your Reverb Types by creating new ones from scratch or from an existing one, as well as renaming and deleting them. Finally, the notebook provides controls to adjust internal parameters of a chosen Reverb Type. So let's describe them in detail.
The TAP Reverberator manual has detailed advice about setting the following plugin parameters.
Some people will agree that the BYPASS button provides the most useful feature of the program. ;-)
It's all about creating the perfect sounding reverb for your own use! TAP Reverb Editor comes with a set of Reverb Types, but the whole point is that you can create your own ones. Let's see what the program provides to this end.
These buttons provide functions for Reverb Type management:
Any changes you make to any Reverb Type (including creating, renaming and deleting them) remains in memory until you explicitly tell the program to save Reverb Types to file (more on saving later). So if you mess something up, just exit the program without using the Save / Export button, and all your changes will be gone.
Reverberation is modelled by a set of comb filters, allpass filters and a bandpass filter. The maximum number of comb filters is 20, and the same limit applies to allpass filters. (It's easy to heighten this limit in the source code, but that is beyond the scope of this manual.)
The notebook pages Comb Filters and Allpass Filters consist of a graphical display representing each comb/allpass filter with a vertical line. There are controls to cycle through all filters (Next and Prev buttons), add/remove filters (New, Del) and adjust the parameters of the currently selected filter (spin/slider controls at the bottom of the page). The currently selected filter is highlighted in the graphical display.
The reverb sound will immediately follow the changes you make to filter settings. It is possible to set filters so hot that they start operating as oscillators instead of filters (usually at extreme high feedback and extreme low delay time settings). If this happens while you are editing a Reverb Type, don't panic. Just hit the BYPASS button -- that will zero out all internal buffers so everything will cool down. While the effect is bypassed, move the filter parameters that caused trouble back to the 'safe area', then re-enable the plugin.
Comb filters are responsible for creating early reflections. They have three parameters: Delay, Feedback and Freq. Response. The delay time is proportional to the distance the sound travels before it reaches your ear as an early reflection. As each comb filter simulates a certain area where acoustic reflection occurs (a wall or the ceiling for example, but possibly other objects as well), the delay time you set determines the virtual distance of this object from the sound source and the listener. In the graphical display, the horizontal position of the line representing the filter depends on this parameter.
Various kinds of materials reflect and absorb acoustic energy in various degrees. The feedback parameter provides control of this effect. For something that is a very good reflector (a flat brick-wall for example) a reasonably high feedback value should be used. In the graphical display, the length of the line representing the filter depends on this parameter.
There is a secondary effect taken into account when simulating early reflections: not only does the reflection ratio of acoustic surfaces vary from one to another, but the reflection ratio of surfaces is also frequency-dependent. Higher frequencies are attenuated more, thus high frequency components decay in a shorter time. The Frequency Response slider sets the amount of high attenuation for a given comb filter. There is nearly no extra attenuation of high frequencies when it is set to zero. In the graphical display, the color of the line representing the filter depends on this parameter. Filters with lower Freq. Response values (which mean smaller extra attenuation of high frequencies) will be plot with a 'hotter' shade.
Allpass filters are responsible for creating a reverb tail that makes the reverberation thicker and more natural sounding. They have two parameters, identical to the first two parameters of comb filters. Note, however, that the maximum delay time of allpass filters is about an order of magnitude lower than of comb filters. The graphical representation of allpass filters is done in the same way as comb filters, but here each line has the same color.
This notebook page provides two sliders to set the low and high cutoff frequencies of the bandpass filter.
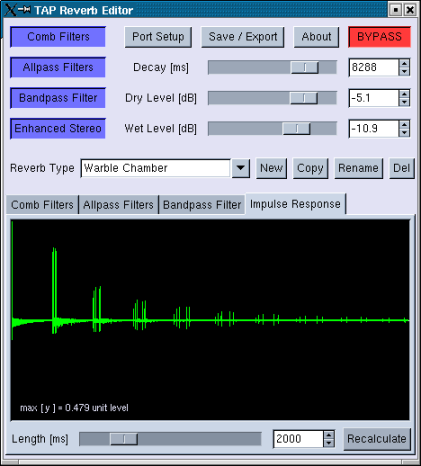
A cornerstone of linear systems theory is that any linear system (such as a complex digital filter like this reverb) is unequivocally determined by its impulse response. Apart from this theoretical curiosity, it may be useful to take a look at the impulse response of a Reverb Type while inspecting or modifying it.
The Length slider below the plot lets you choose the end time of the simulation (with the start point being at time zero). The time needed to finish plotting is proportional to the time simulated. As this is quite a CPU-demanding operation, it is never performed automatically: you have to press the Recalculate button every time you want to see a new plot of the currently active Reverb Type.
Please note that the simulation shows the impulse response of the 'clean' reverb: the settings of the dry and wet levels as well as the BYPASS button are irrelevant. The decay time setting and the global switches (Comb Filters, Allpass Filters, Bandpass Filter, Enhanced Stereo) do affect the plot, though.
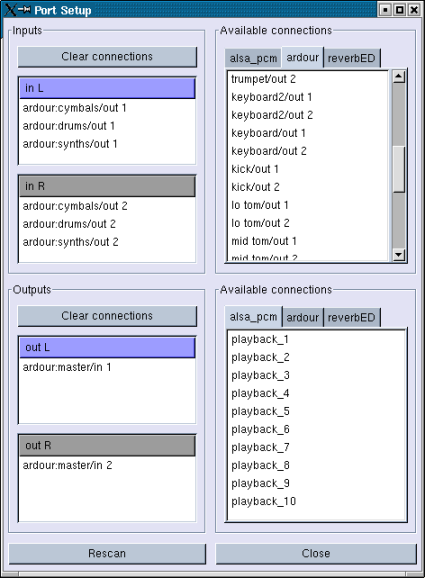
When you press the Port Setup button, a dialog similar to the above pops up. It is very much like the input/output connections dialog of a mixer-strip in Ardour, the only difference being that here the input and output ports setup is performed in one dialog.
The upper half of the window handles connections to the input ports. On the left, each input port has a list of its current connections. By clicking on any list item, that connection will be removed. The Clear connections button removes all connections from the input ports.
The notebook on the right has a page for all client programs and hardware devices available to the JACK server. By selecting a page, you will see a list of that client's output ports. Clicking on a list item connects the port to the currently selected input port (which has a blue header). You can change the selected input port by clicking on the unselected (grey) list header. When you add connections to the input ports, the selection alters between the two inputs.
Connecting the outputs can be performed in the same manner. If you start up another JACK client while the dialog is open, you may press the Rescan button to make it appear in the notebooks on the right. Closing and re-opening the dialog has the same effect, since JACK ports are re-read and a new dialog instance is built every time.
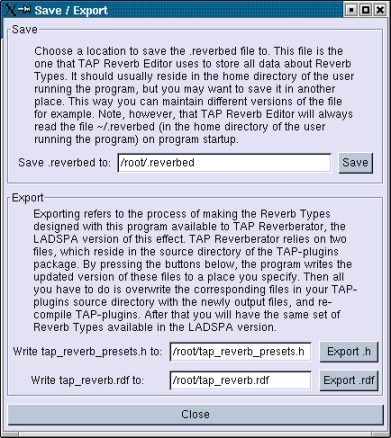
After you have had a good time messing around with Reverb Types, you may want to leave everything as it was. In this case, just exit the program and every change you made will be lost. However, there may be times when you do have something to save: in this case, you will want to make the changes permanent. So press the Save / Export button, and the above dialog will appear.
Since there is quite a lengthy explanation included in this dialog,
things are pretty straightforward. The program stores everything there
is to Reverb Types in one file, and reads it every time you start the
program. The file read on program startup is always
~/.reverbed (a file called .reverbed in your
home directory), but you have the option to write to another file in
case you want to maintain different versions of the file.
A request to all users
The author of this program kindly asks you that if you develop any new Reverb Type that you think would be of general interest, please send him your.reverbedfile via e-mail, along with your name (if your mail headers don't tell it all). Good Reverb Types will be included in the next release (with due credit given to the original author, that's why I need your name). This is a perfect way to give something back for this software, and other users will benefit from it as well. Thank you.
Since this program is a JACK client, it cannot be automated from within powerful hosts such as Ardour. However, if you created a good Reverb Type, the program supports transferring its data into TAP Reverberator, which is a LADSPA plugin for the same reverberation algorithm. It has the advantage of being automatable on Ardour mixes, but it has no capabilities for editing Reverb Types (that's why TAP Reverb Editor was created, after all).
Exporting is the process of making the set of Reverb Types in TAP
Reverberator be identical to the set of Reverb Types in this
program. To do this, you have to export two files named
tap_reverb_presets.h and tap_reverb.rdf to
an arbitrary place on your computer storage. In the source code
directory of the TAP-plugins LADSPA plugin package you will find two
files with these names. Overwrite them with the newly exported ones,
and re-compile and re-install the TAP-plugins package. That's all, you
will have the same Reverb Types available in TAP Reverberator after
that. Pretty cool, eh?