More robust remote X tunneling
Running remote X applications is extremely common in the UNIX world of
remote administration. Using ssh -X to log in to a remote system and
launch graphical programs there is easy and convenient. However, it
does not always work. This article describes a method that will work
in case ssh -X won’t do.
Difficulties arise if, for example, you cannot connect directly to the target host. That is, only after logging on to an intermediary host (a gateway, for example) can you log in to your target from the intermediary host. There may be more than one intermediary hosts you have to log in to finally get through to your target machine.
If you are lucky, you can use ssh -X to log in to the hosts, one after
another. But this requires that all the intermediary hosts as well as
the target has an SSH daemon running that is configured with the
X11Forwarding option enabled. Another requirement is the presence of X
libraries on all these systems – and since it is customary for the
intermediary gateways to be headless boxes, there is a good chance
that at least one of them will lack the capability of out-of-the-box
X11 forwarding. And no, you have no root access to turn it on.
Even if none of the above obstacles stops you from using ssh -X, it
may still not work. Random programs just refuse to start up, giving
some X related error such as this:
X Error: BadAtom (invalid Atom parameter) 5
  Major opcode:  20
  Minor opcode:  0
  Resource id:  0x134
So what means do you have to robustly access remote X applications? The solution is to use the generic SSH port forwarding facility to tunnel the traffic through the nodes, to emulate the effect of the -X option, even in cases when it wouldn’t even work. The difference is that the TCP port forwarding feature of the SSH daemon is much more commonly enabled, and no X libraries have to be present on the intermediary hosts.
SSH port forwarding
SSH (the client) is a program for logging into a remote machine and for executing commands on a remote machine. It is also capable of forwarding X11 connections and arbitrary TCP ports over the secure channel. Since we’ve ruled out X11 forwarding, let’s focus on TCP port forwarding. Spending time on mastering this powerful tool is worthwile, since it can be used in a range of other common scenarios as well, as you shall soon see.
TCP port forwarding comes in two modes of operation: local port forwarding (enabled by the -L command line option) and remote port forwarding (-R option). Understanding these options can be a bit tricky (and the SSH manual page is quite terse), so let’s see some examples.
Local port forwarding
Perhaps the most common use for local port forwarding is firewall piercing from the inside. Let’s say that Joe at Mega Widgets Corp (a large international company with strict HTTP filtering and firewalling) wants to download a few files from the outside network. For the sake of simplicity, let’s assume that the files are available via HTTP. As usual, outbound HTTP traffic to the sites really worth visiting has been precautiously blocked by the network admins. However, outbound traffic on port 22 (SSH) is not blocked, and Joe has a home system running, from which the outside network is accessible. Joe is able to login to his home system from Mega Widgets via SSH.
In this case local forwarding enables Joe to designate one of the local ports (on his work computer) and establish a tunnel from that local port to a remote location (in this case his home computer). Traffic originated from his work computer sent to the local port will be tunneled to the remote end. The destination where this traffic will be sent is determined by the command line options with which the tunnel is established. The following figure serves to clarify our discussion.
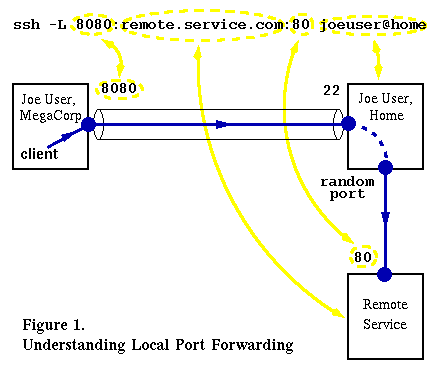
After Joe has issued the SSH command in a terminal window and typed his password for his joeuser@home account, he has an SSH tunnel between his work and home machines. This tunnel accepts connections from the local (left) end on port 8080 and transports them on the secure channel to Joe’s home machine, connecting to the standard TCP port where the SSH daemon is listening (port 22). The SSH daemon at the endpoint of the tunnel makes connections to the remote service provider’s port 80 (standard HTTP). The connection originates from a free local TCP port on Joe’s host machine – this is the originating location of the request that the remote server is able to see.
Using the tunnel is easy: Joe sets his browser to use a proxy server at localhost:8080. This means that outbound HTTP requests will be sent to the tunnel’s left endpoint, securely transported to the other end, where a connection is originated to the remote destination. Replies from the remote server will be sent back on the same path. Note that while the tunnel secures data transport between its endpoints, data between Joe’s home machine (the proxy) and the remote server is sent in the clear.
Remote port forwarding
Now let’s suppose that Joe wants to keep an eye on his downloads during the weekend, and hence needs a way to access his work computer from home. Again, the company firewall prevents all inbound connections, but allows outbound SSH connections on port 22. In this case remote port forwarding allows Joe to leave his workplace on Friday with a tunnel established between his work and home computers, allowing connections on the remote end, thus allowing him to access his workplace from home, as depicted by Figure 2:
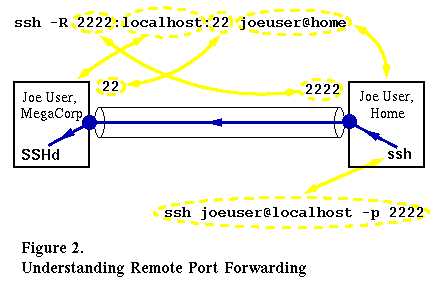
The tunnel forwards connections made to port 2222 on the remote end to the local end, where a connection is originated to localhost:22, that is, the local SSH daemon running on Joe’s workstation. In this case Joe has not exploited the possibility that the destination host to forward to could be something other than localhost – that way the tunnel could forward traffic to another host on the company (or even outside) network. But just as with our previous local port forwarding example, he could have done that here as well.
Using this tunnel is also easy: when at home, Joe initiates an SSH session to localhost:2222 with the command also shown in Figure 2. The SSH client connects to port 2222 of his home machine. Since this is the remote end of the tunnel, the connection is transported to the local end, which is on his work computer, and forwarded to port 22 of localhost (the same machine) there. The result is that Joe is able to login to his work computer from home.
Back to X tunneling
With a solid understanding of how SSH tunnels work, it is now trivial to set up an SSH tunnel with the aim of X forwarding. What we want is a (secure) channel between the remote host (on which X applications run) and our local machine (on which the X server runs). We want the X apps to be able to connect to the server, so the tunnel has to accept connections on the remote end. Thus, we have to use remote port forwarding. And since we want the requests to reach our local X server, we have to designate a forwarding destination of localhost:6000 (assuming we want to use X display 0). The port numbering scheme of X is 6000+n where n is the display number. So if you use a display other than the first (0-th), then use the corresponding port instead of 6000.
What port should we configure for the remote end? It should be a port that corresponds to an X display number, one that does not yet exist on the remote host. We need this because when configuring the remote applications to connect to the appropriate X server, we need an X display number instead of a TCP port number. Let’s say that display 99 is free on the remote server. In this case the complete command for establishing the tunnel:
ssh -R 6099:localhost:6000 joe@remote-server
Additional nuisances
After establishing the tunnel (which, by way of the above command,
also yields a terminal opened to the remote host) we have to tell the
applications on the remote end to connect to display 99 on that
machine. To do this, set the DISPLAY environment variable to
127.0.0.1:99 in the remote terminal. In bash or ksh this can be
accomplished by typing export DISPLAY=127.0.0.1:99.
Another nuisance is that the local X server mush accept incoming TCP
connections. Since local applications normally communicate with the X
server via a local socket instead of TCP, this is generally considered
insecure and thus frequently disabled by default. If the X server is
started with parameters that contain -nolisten tcp, then TCP
connections have been disabled and settings have to be changed.
Unfortunately, how to do this is vendor (distribution) dependent.
The final step to be taken before remote X applications finally work
is configuring the X server to accept connections from the specific
address of the tunnel endpoint. Enabling incoming TCP connections is a
general X configuration issue, but even with that out of the way, X
still has an access control mechanism that maintains a list of those
hosts and users that are allowed to connect. The xhost command is used
to add or delete hosts or users to the access list. In our case, since
at the local end of the tunnel connections to the X server appear as
coming from localhost, what we need is issue xhost +localhost. After
that, I like to test whether the connection really works by starting
xclock, a small X application. And voila:

Tunneling through multiple gateways
We can take all this a step further and establish a tunnel through an
arbitrary number of intermediary hosts (gateways). The tunnel in this
case is really a chain of tunnels between any two adjacent hosts. For
the sake of example, let’s assume that apart from my home machine,
there are three machines called red, blue and black and that I
can only access them in this order, i.e. I can only access red from
home, only blue from red, and only from blue can I access
black, where I actually want to run some X app. Let’s assume that I
have an account for tom on all machines. Assuming that TCP port 6099
is available on all hosts, the following commands will give me a
terminal to black from which I can start X applications:
home> xhost +localhost
home> ssh -C -R 6099:localhost:6000 tom@red
Password: ********
red> ssh -C -R 6099:localhost:6099 tom@blue
Password: ********
blue> ssh -C -R 6099:localhost:6099 tom@black
Password: ********
black> export DISPLAY=127.0.0.1:99
black>
This works even if red and blue don’t even have X libraries. And
naturally, X11 forwarding is not required from any of the SSH daemons
involved. I have added -C for data compression in the tunnel; in my
experience the connection might break without it every now and then if
the vendor (or even version) of the SSH daemons is different.
HTTP forwarding through multiple gateways
Continuing my example with the above hosts red, blue and black,
let’s assume there is a super secret HTTP service running at
black:8080 that I want to access from home. In this case I have to
establish a tunnel with local forwarding, since HTTP requests will
originate from my machine. Let’s say I want to use port 8099 for the
tunnel. Here’s what to do:
home> ssh -C -L 8099:localhost:8099 tom@red
Password: ********
red> ssh -C -L 8099:localhost:8099 tom@blue
Password: ********
blue> ssh -C -L 8099:localhost:8080 tom@black
Password: ********
black>
… and, in my locally running browser, connect to
http://localhost:8099 which is the local end of the tunnel. This
will allow me to access the HTTP service that is running behind
multiple layers of gateways (presumably firewalls that I somehow have
access to, but that’s not the point).